Because Life’s Better in a Bowl (Especially When It’s Got Sauce)
So You Want Something Crunchy, Saucy, and Low-Key Addictive? Say Less.
You ever have one of those days where you want something so good it slaps, but you also want it to feel somewhat nutritious so you can sleep at night? Yeah, this bowl’s got your back.
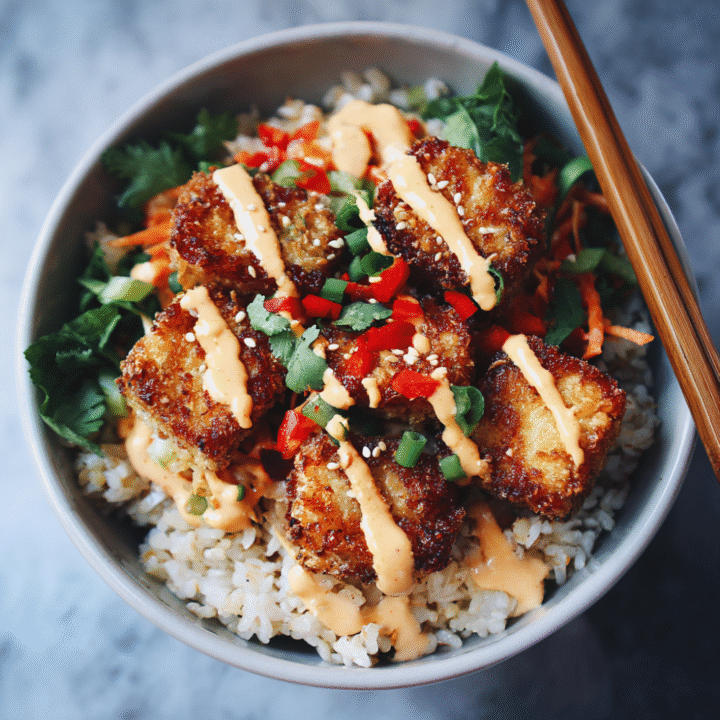
This Crispy Tofu Rice Bowl with Vegan Spicy Mayo is the ultimate combo of crispy + creamy + saucy + satisfying. It’s basically your favorite takeout vibes—but made at home, for cheaper, and probably with way less oil (unless you’re feeling wild, in which case, no judgment).
Let’s build a bowl that’ll make you want to high-five yourself.
Why This Recipe Is Awesome
- Crispy tofu without deep-frying. Your air fryer (or oven) is about to be the MVP.
- Spicy mayo = flavor bomb. You’ll want to drizzle it on everything. And I mean everything.
- Customizable as heck. Use whatever veggies you have. No two bowls need to look the same.
- Meal prep gold. Make extra and eat like a boss all week.
- Actually filling. This isn’t one of those sad salad bowls that leaves you hangry in an hour.
Bonus: It looks fancy, but you can make it in yoga pants while binge-watching cooking reels. Zero judgment.
Ingredients You’ll Need
Let’s keep it simple. You probably already have most of this hanging out in your kitchen.
For the Crispy Tofu:
- 1 block of extra-firm tofu – Pressed for 15–30 min. Don’t skip this or you’ll get sog-town.
- 1 tbsp cornstarch – The secret to that good crisp.
- 1 tbsp soy sauce – For flavor.
- 1 tsp sesame oil – Optional, but brings the vibes.
- 1 tbsp neutral oil – For pan-frying or roasting.
For the Bowl:
- Cooked rice – Jasmine, brown, sushi rice—whatever makes your soul happy.
- Veggies – Think shredded carrots, sliced cucumber, edamame, avocado, red cabbage, etc.
- Green onions & sesame seeds – For garnish. Fancy vibes without trying too hard.
For the Vegan Spicy Mayo:
- 3 tbsp vegan mayo – Any brand you like. Or make your own if you’re feeling extra.
- 1–2 tsp sriracha – Adjust to your heat level.
- ½ tsp rice vinegar or lime juice – Adds that tangy zip.
- Pinch of garlic powder – Because flavor.
Step-by-Step Instructions
- Prep the tofu.
Press it first. Use a tofu press if you’re fancy, or just wrap it in a towel and put something heavy on it. (A stack of cookbooks works. So does a cast iron pan.) - Cut and season the tofu.
Cube it up, toss with soy sauce, sesame oil (if using), and cornstarch until evenly coated. You want a light, dusty coating, not globs. - Crisp it up.
Air fry at 400°F for 12–15 minutes (shake halfway), OR roast in a 425°F oven for 25 minutes, flipping halfway. Pan-frying? Go for golden and crispy on each side, about 3–5 min per side. - Make the spicy mayo.
Stir together the vegan mayo, sriracha, vinegar/lime, and garlic powder in a tiny bowl. Taste and adjust. More sriracha = more 🔥. - Assemble the bowl.
Start with rice, add your veggies, pile on that crispy tofu, and drizzle like you mean it with the spicy mayo. Sprinkle with green onions and sesame seeds for that fancy touch. - Take a moment.
Admire your masterpiece. Then devour it. Maybe even lick the bowl? No one’s watching.
Common Mistakes to Avoid
- Skipping the tofu press.
Wet tofu = floppy texture. Press it. Seriously. It makes a huge difference. - Overcrowding the pan or air fryer.
Give those tofu cubes room to breathe or they’ll steam, not crisp. Ain’t nobody got time for mush. - Using cold rice straight from the fridge.
Reheat it or warm it in the bowl with a splash of water. Cold rice is for sad leftovers, not vibrant bowls. - Going overboard with the spicy mayo.
Okay, fine—there’s technically no such thing as too much. But if your bowl is swimming in it, maybe ease up next time.
Alternatives & Substitutions
- No tofu?
Try tempeh, chickpeas, or even crispy cauliflower. We don’t discriminate. - Gluten-free?
Use tamari instead of soy sauce and double-check your sriracha and mayo labels. - No rice?
Quinoa, cauliflower rice, soba noodles—go wild. - Low spice tolerance?
Start with less sriracha. Or swap it for a little sweet chili sauce for a milder kick. - Want more veggies?
Steam some broccoli, toss in roasted sweet potato, or go big with a full-on rainbow bowl. No wrong answers here.
FAQ (Frequently Asked Questions)
Do I have to press the tofu?
Short answer: Yes. Long answer: If you want it crispy and not sad, press it.
Can I meal prep this?
Absolutely. Store tofu, rice, and veggies separately, and keep the spicy mayo in a little container. Mix when ready to eat.
How long does it keep?
3–4 days in the fridge. But let’s be honest—it probably won’t last that long.
Can I pan-fry instead of bake/air fry?
Yep. Medium heat, nonstick pan, a little oil. Just flip those cubes till golden and crispy on all sides.
Is the spicy mayo really spicy?
Only if you go hard on the sriracha. Start with a little, taste, and add more as needed. It’s your bowl, your rules.
What’s the best rice for this?
Honestly? Whatever’s already in your pantry. Just make sure it’s cooked well. Dry, undercooked rice is the actual worst.
Final Thoughts
This Crispy Tofu Rice Bowl with Vegan Spicy Mayo is proof that plant-based meals don’t have to be boring or complicated. It’s got texture, flavor, and a whole lot of sauce swagger.
Whether you’re team meal-prep or just trying to get dinner on the table before you cave and order takeout—this bowl’s got your back. Quick, satisfying, and customizable. Basically everything a weeknight recipe should be.
Now go build your bowl. And don’t forget the sauce. Always the sauce. 🥢🔥🍚
Want a dessert to follow this? I got ideas. Just say the word.
AKA: The Meatless Friday Brunch You Didn’t Know You Needed
So You’re Craving Something Tasty But Too Lazy to Spend Forever in the Kitchen, Huh? Same.
Look, I love a fancy brunch as much as the next person. But do I want to break out 12 different utensils and summon the ghost of Julia Child just to get a decent piece of toast? Nope. Enter: Vegan Coconut Yogurt Custard Toast — aka the low-effort, high-payoff dish that makes you look like you tried way harder than you did.
It’s like French toast’s hipster cousin who shops at the farmer’s market and wears Birkenstocks unironically. Perfect for Meatless Friday. Or honestly, any day that ends in “y.”
Why This Recipe Is Awesome
Let me count the ways—because I’m nothing if not enthusiastic about minimal-effort recipes that taste like dessert and double as breakfast.
- No eggs, no dairy, no drama. All plant-based, baby.
- Ridiculously easy. If you can stir, you can make this.
- Foolproof. Like, even your most kitchen-challenged friend could nail it.
- Sweet, tangy, crispy, creamy. All the textures. All the vibes.
- Instagram-worthy. Not that you have to take pics. But, like…you’ll want to.
It’s the kind of recipe that makes people say “Omg, you made this?!” and you just smile like you didn’t slap it together in 10 minutes while still wearing socks and a questionable hoodie.
Ingredients You’ll Need
Here’s the grocery list. No weird stuff. Just tasty things that play nice together.
- Thick-sliced bread – Brioche or sourdough works great. Go for something sturdy. Floppy sandwich bread won’t cut it here.
- Coconut yogurt – Get the creamy kind, not the watery “health” version. You want luscious, not sad.
- Maple syrup – For sweetness and good vibes. Honey’s a no-go if you’re keeping it vegan.
- Vanilla extract – Optional, but highly recommended. Adds that “I know what I’m doing” flavor.
- Ground turmeric – Just a pinch. For color and flair. Your toast will look golden and expensive.
- Fresh fruit – Berries, banana slices, peach wedges, or whatever looks cute at the store.
- Coconut flakes or granola – For crunch. Optional but adds texture (aka: the adulting part of the dish).
- Pinch of salt – Because salt makes sweet things better. It’s science.
Step-by-Step Instructions
- Preheat your oven to 375°F (190°C).
Don’t skip this. Cold ovens don’t do much for custard dreams. - Make the custard.
In a small bowl, mix together:- ½ cup coconut yogurt
- 1 tablespoon maple syrup
- ½ teaspoon vanilla extract
- A pinch of turmeric
- A tiny pinch of salt
Stir it till it’s smooth and you feel mildly accomplished.
- Prep your bread.
Lay out 2–4 slices of thick bread on a parchment-lined baking tray.
Use the back of a spoon to press a shallow “well” into the middle of each slice—like making a little boat for your custard. - Spoon in the custard.
Fill the wells with your creamy coconut concoction. Be generous, but don’t flood the toast like it’s Venice in the rainy season. - Top with fruit.
Add your sliced berries, bananas, or whatever fruit you picked. Pretend you’re plating for a café. Bonus points if you angle the fruit like you’re auditioning for MasterChef. - Bake for 12–15 minutes.
You’ll know it’s done when the edges are golden and the custard looks set but still soft in the middle. - Garnish and serve.
Sprinkle with coconut flakes or granola. Drizzle more maple syrup if you’re feeling extra. Eat warm.
Common Mistakes to Avoid
- Using thin bread – It’ll sog up like a sad sponge. No thanks.
- Forgetting to preheat – Rookie move. You’ll end up waiting twice as long for toast that’s meh.
- Overloading the custard – It’s toast, not a soup bowl. Too much and it spills everywhere.
- Using sour yogurt – Not all coconut yogurts are created equal. Taste it before using. If it tastes like regret, skip it.
- Microwaving instead of baking – No. Just… no. Unless you want rubber toast.
Alternatives & Substitutions
- No coconut yogurt?
Use almond, cashew, or soy yogurt. Just aim for one that’s thick and unsweetened. - Want more protein?
Stir in a tablespoon of almond butter or a scoop of vanilla vegan protein powder. You’ll feel smug all day. - No turmeric?
Skip it. It’s just there for the color. No one’s judging. - Need it gluten-free?
Use gluten-free bread—but make sure it’s sturdy. Some GF breads crumble under pressure (literally). - Low on fruit?
Try jam swirls, chopped nuts, or dark chocolate chips. Still classy. Still yum.
FAQ (Frequently Asked Questions)
Can I make this the night before?
Sure, but it’s way better fresh. You can prep the custard mix ahead and keep it in the fridge.
Is this actually healthy, or just pretending?
It’s pretty solid. You’ve got whole grains, plant-based protein, fruit… It’s practically a smoothie on toast.
Can I air-fry it instead of baking?
Yes! Just lower the temp to 350°F and cook for about 6–8 minutes. Check early so you don’t toast it into oblivion.
Is it kid-friendly?
Absolutely. They’ll think it’s dessert for breakfast. You don’t have to tell them it’s vegan. Let that be your secret power.
Does it taste like coconut?
A little, yeah. If you’re coconut-averse, use a neutral yogurt like plain almond or soy.
Can I double the recipe?
For sure. Just make more custard and line up more bread slices. You’re feeding a brunch crowd now—respect.
Final Thoughts
So there you have it—Vegan Coconut Yogurt Custard Toast, your new go-to when you want to feel fancy without breaking a sweat (or a blender).
It’s easy, it’s pretty, and it makes Meatless Friday taste like a treat instead of a punishment. Plus, if someone asks how you made it, you can say “Oh, it’s this custard toast I whipped up” and sound effortlessly cool.
Now go impress someone—or just yourself—with your new brunch magic. You’ve earned it. 🍞✨
Let me know how yours turns out—bonus points if you name your toast.